Thursday, November 19, 2009

Whole Wheat Bread Baking


My son loves bread especially whole wheat bread. Today my sister requested me to bake some sausages bun as her son loves it. Well, plain flour with sausages does not seem to be so good so i decided to bake whole wheat sausages bun. I eat the sausage and my son takes the whole wheat, good idea isn't it?

I took the recipe from Bread Magic by chef Alan Ooi under Y3K publication.

Prepare Time: 2 hours
Bake Time: 15 minutes
Serving: 40 pieces

Ingredients:
Part A:
High protein flour 300grams
Whole wheat flour 200grams
Brown sugar 40grams
Salt 1 teaspoon
Instant yeast 3 teaspoons

Part B:
Cold water 300ml

Part C:
Shortening 40grams

For Glazing:
Egg 1 piece (beaten)

For Topping:
White sesames

Filling:
Cocktail sausages 40 pieces

Instructions:
1. Mix Part A in the mixer and mix well.
2. Add in Part B until a dough is form.
3. Add in Part C bit by bit until the dough turns smooth and elastic to the touch.
4. Leave dough in a big bowl or container and cover with a damp cloth. Proof in a warm place for at least 30 minutes or longer when the dough is doubled in size.
5. Divide the dough for 25gram each and shape them into small ball.
6. Cover the dough balls with a damp cloth and let it prove for another 5 minutes before wrapping the sausages.
7. Flatten and rolled them into a longish shape and wrap in the sausages. Place them onto the greased bake tray.
8. Cover it with damp cloth and let it proves for double the size.
9. Send to oven and bake for 180C for 15minutes after brush a layer of egg and applied the sesames.
10. Remove them from baking tray once out from oven and let it cools down at rack.

Tuesday, November 17, 2009

Mini Strawberry Swirl Cheesecake


The good things about mini cheesecake is you do not have to slide them before serving as cutting cheesecake is quite a troublesome work to me. Secondly, it is easier as the crust making process can be skipped, substituted by mini marie biscuits or any cookies that is small enough to fit into the baking cup. You can use muffin baking cup or cupcake baking cup or any mini size baking cup as long with paper lining. I first tried by putting a lump of strawberry pie filling on top of the cheese but i found it slightly sank into the cheese after bake. Putting the strawberry pie filling on top of the biscuit worked better. Just use a tooth pick and do a swirl effect after filling the cheese is good enough to get a nice apperance. The disadvantages for this mini size cheesecake is one need quite a number of baking cups. I only have a dozen of baking cups so i took 6 rounds for baking. Plus, you need sometimes to let it cool down a bit before removing the cake from the baking cup for the next refill.

I slightly modified this recipe from cookingforengineer website.

Prepare Time: 1 hour
Bake Time: 45-1 hour
Serving: 60 pieces and some left overs

Ingredients:
Philadelphia cream cheese 1kg
Fine sugar 1 cup
Eggs 4 pieces
Strawberry pie filling 300gram
Mini Marie Biscuits 60 pieces

Instructions:
1. Rest cream cheese at room temperature for at lest one hour to ease the later blending process and also to avoid lump.
2. Cut the cream cheese to cubes to fasten the blending process and avoid lump.
3. Beat the cream cheese until smooth and add in sugar and beat until the sugar is fully dissolved in the cheese.
4. Scape down the cream cheese at the mixer side wall.
5. Add in eggs one at a time and beat well. Repeat for all the eggs.
6. Place the paper liner on the muffin cups.
7. Place the biscuits into the muffin cups.
8. Place a teaspoon of strawberry pie filling on the biscuits.
9. Spoon cream cheese mixture into the muffin cups for 3/4 full.
10. Preheat the oven at 175C and add a tray of hot water into the oven (please refer to my first cheesecake recipe )
11. Bake for 15min. The temperature setting for each oven might be different. For my case, 175C for 15min can totally turn my cheesecake to dark brown color. So, you might fine tune for yours.
12. Let the cheesecakes cool down on the rack and then chill in the fridge.

Anchovies Chili or Sambal Ikan Bilis


After introducing my home made chili paste, i will start to introduce some chili food using this chili paste. First of all, the simplest but very yummy dish will be anchovies chili or sambal ikan bilis. This is a simple dish however when i was first try out i failed! I did not cook long enough as the result it was still taste "wet". Oil must be sufficient! My second and third attempt were turn out failing too due to i did not put enough cooking oil and the end result turned up very dry and it was like almost "burn out". So, the secret is cook longer until it turns brown red and cooking oil must be sufficient. Too little or too much will also jeopardize the taste. I observed 1 tablespoon of chili should follow with 1 tablespoon of chili paste. Try it out!

Prepare Time: 5min
Cook Time: 10min
Serving: 3-4 persons

Estimate Cost: RM2

Ingredients:
Home made chili paste 6 spoons
Cooking oil 6 tablespoons
Anchovies 100gram or depend
Sugar 1 tablespoon

Instructions:
1. Remove the head and the internal organs of anchovies.
2. Wash and drain the anchovies and set aside.
3. Heat up the fry pan and add in the cooking oil.
4. Deep fry anchovies until it turns crunchy or brown and set aside.
5. Reduce heat to low.
6. Pour in the home made chili paste and stir continuously to avoid the paste from burn.
7. Keep stirring until the chili turns to brownish red.
8. Add in the sugar and stir a short while.
9. Turn off the heat.
10. Add in fried anchovies and stir evenly then serve.

Yam Rice with Chicken


There are a few secret i learn from my sister-in-law on this recipe. First, first frying the chicken and set aside. Do put add the chicken into the rice cooker for double cook as it will cause the chicken meat get harder. Only put it in when the rice is cooked or when you hear the sound "put" from the rice cooker. Second, you do not have to fry the rice as the result will still very good. Hong Zheng likes it very much!

Prepare Time: 30min
Cook Time: 10min
Serving: 3-4 persons

Estimate Cost: RM8

Ingredients:
Chicken breast meat 200gram with skin removed
Yam small size 1 piece
Dry mushroom big 4 ears
Onion medium 1 piece chopped
Garlic 6 gloves chopped
Dry shrimps 50gram
White rice 3 cups
Water 700gram
Salt 1 teaspoon
Pepper
Soy source 2 tablespoons
Dark soy source 2 table spoons
Cooking oil 3 tablespoons

Instructions:
1. Wash and cut chicken meat into small cubes and marinate with salt, pepper and soy source while getting up the rest of the ingredients.
2. Remove the yam skin and cut into small cubes.
3. Soak mushrooms and cut into cubes.
4. Wash and drain the dry shrimps.
5. Wash and drain the white rice.
6. Heat up the cooking oil and stir in 1/3 of the garlic and onion.
7. Stir fry the chicken meat until it cooked and set aside.
8. Add in some cooking oil and heat it up. Stir in the remaining garlic and onion and add in the mushrooms and yam.
9. Add salt.
10. Scope up the mixture and put them in the rice cooker.
11. Add the rice and water.
12. Add in the soy source and dark source.
13. When the rice cooker turns from cooking to steam phase, add in the chicken meat.

Monday, November 16, 2009

Home Made Chili Paste


I like hot and spicy food. In the past, i use to cook with the ready make chili paste for curry fish head, curry chicken and other possible ready made chili paste available in market. After some insight views from my sister, i came to realize with a very minimum effort i can also cook very nice hot and spicy food without buying any ready made chili paste from supermarket. In fact i was quite proud with it because i can also proudly present some tasty chili food at home. Hubby loves my chili food.

In the past i was quite hesitate to cook hot and spicy food at home using natural ingredients because i need to blend chili, onion and garlic each time i want to cook chili food. With this recipe, you can prepare the chili paste in quite a lump sum and frozen it for later use. I found it very convenient and do not worry the freshness of the paste as it remind good after 2-3 months in my fridge. Just let it cools down in room temperature for at least one hour before you want to scope out the portion you want. After that just put it back for frozen.

Below recipe will produce around 500gram chili paste.


Prepare Time: 1 hour


Ingredients:
Dry Chili 150gram
Onion medium size 8 pieces
Garlic 6 gloves
Candle nuts (Buah Keras) 100gram - optional but it adds the aromatic of the paste

Instructions:
1. Cut away the top part of the chili. Cut the dry chili into halves with scissor. Remove the chili seeds by cutting through the halved chili and remove the seeds with scissor.
2. Add hot water to the chili until it is fully covered and rest it until it becomes soft.
3. Drain away the water.
4. Peel off the onion and garlic skin. Wash and drain well.
5. Wash the candle nuts and drain well.
6. Divide all the ingredients into two portion so that it can fit into the standard blender.
7. Add some water when the chili mixture stick on the blender side wall. Continue blending it until it turns to a smooth mixture or paste.
8. Repeat for the another portion.
9. Add the two portion together after blend and store in a storage for later use.


Remark: This chili paste will become the standard chili paste in any of my chili recipe in this blog.
Let say, if you want to add some kunyit in your recipe, just blend the kunyit and afterwards mix into this chili paste.

Saturday, November 14, 2009

Lemak Prawns or Lemak Udang


If you like chili and seafood, this is a must try recipe! I love this recipe because it is so simple and it is a sure work recipe. In this recipe, i use fresh milk instead the coconut milk. You may use coconut milk if you want.


Prepare Time: 30min
Cook Time: 30min
Serving: 3-4 persons

Estimate Cost: RM12

Ingredients:
Fresh prawns 300gram
Cabbage 1 piece
Home made chili paste 3 big spoons
Fresh milk 300ml
Curry leaves 2 stalks (optional)
Cooking oil 2 tablespoons

Instructions:
1. Cut away the prawn's antenna, wash and drain.
2. Peel off the cabbage, wash and drain.
3. Hot the pan and add two tablespoons of cooking oil.
4. Stir fry the home made chili paste until aromatic and add the cabbage.
5. Stir fry the cabbage and then pour in the fresh milk and stir well.
6. Cover the pan lid and turn to low heat.
7. Cook until the cabbage turns soft in case the milk is too little add in some hot water or add more milk.
8. Add in the prawns and cook until they turn red and then serve warm.

Friday, November 13, 2009

Seaweed Soup


Paid a visit to my eldest sister and she recommended this recipe to me. She told me her daughter love it very much. She immediately gave me some seaweed (or more accurately Hai Dai) and ask me to try out. I found out it uses salted vegetable or Shi Chuan. This dish might not be very suitable for toddler but for someone who loves salty and a bit spicy soup, should give it a try.


Prepare Time: 30min
Cook Time: 30min
Serving: 3-4 persons

Estimate Cost: Not avaible

Ingredients:
Seaweed 300gram
Tomato one piece
Ginger one small piece
Coriander or Chinese Celery one stalk
Tofu one piece (optional)
Salted and spicy vegetable (Shi Chuan) one quarter
Chicken meat 100gram (slide)
Water - 1 litre

Ingredients:
1. Wash and drain the seaweed and cut or tear into small pieces.
2. Wash and drain the Shi Chuan and slide thin.
3. Remove ginger skin and slide thin.
4. Slide chicken meat and blanch and set aside.
5. Wash coriander and chop into inch and set aside.
6. Heat up water and add in the seaweed, Shi Chuan, ginger and chicken meat.
7. Cook until boil and add tomato slice and tofu.
8. Cover the pot lid and cook for about 20min in low heat or until the seaweed turns very soft.
9. Add in the coriander and serve warm.

Monday, November 9, 2009

Fish Omelette Rolls


I came across this recipe in a recipe book called Novum's Kitchen by Madam Pancy Seng. A very simple dish yet delicious. Very suitable to serve as a toddler food. So, i tried to work out and the result was good. Unfortunately i was failed to create the outlook for the second and third piece egg mixture. A good lesson learn was to create a good looking egg omelette one must cover the whole bottom of fry pan and slightly high up at the edge, low heat and wait enough for it to cook before adding the fish meat.

Prepare Time: 10min
Cook Time: 30min
Serving: 2-3 persons

Estimate Cost: RM4

Ingredients for egg mixture:
Eggs 3pcs
Corn flour 1 teaspoon
Water 2 teaspoons

Ingredients for fish filling:
Fish meat 250gram or less or more (You can use flesh fish meat scrap from fish or the ready make fish meat)
Corn flour 1 tablespoon
Salt 1 tablespoon or less depend to your taste
Sugar 1/2 teaspoon
Onion (finely chopped) - optional
Pepper - optional

Instructions:
1. Add water with corn flour and stir well.
2. Beat eggs and add in to the corn flour water and beat evenly.
3. Add some oil to the flat bottom non-stick fry pan. Pour in egg mixture which able to cover the whole bottom of the fry pan and cook for slightly turn brown at the bottom of the omelette in low heat. The upper upper part of omelette should start to turn hard and not in liquid form. Set aside.
4. For fish filling, mix corn flour with salt and sugar also the onion and pepper if wanted. Mince well fish meat.
5. Spread the omelete and smear the fish filling on the omelette. Roll up the form the fish omelette roll.
6. Add a tablespoon of oil to the fry pan and fry the roll until the fish cooked. It is just another 2min for thin layer of fish spread. If thicker spread, cook longer. Optionally, steam the fish rolls for about 10min for thin later of fish spread.
7. Cut or slide into pieces.

Sunday, November 8, 2009

Roselle Swirl Cheesecake


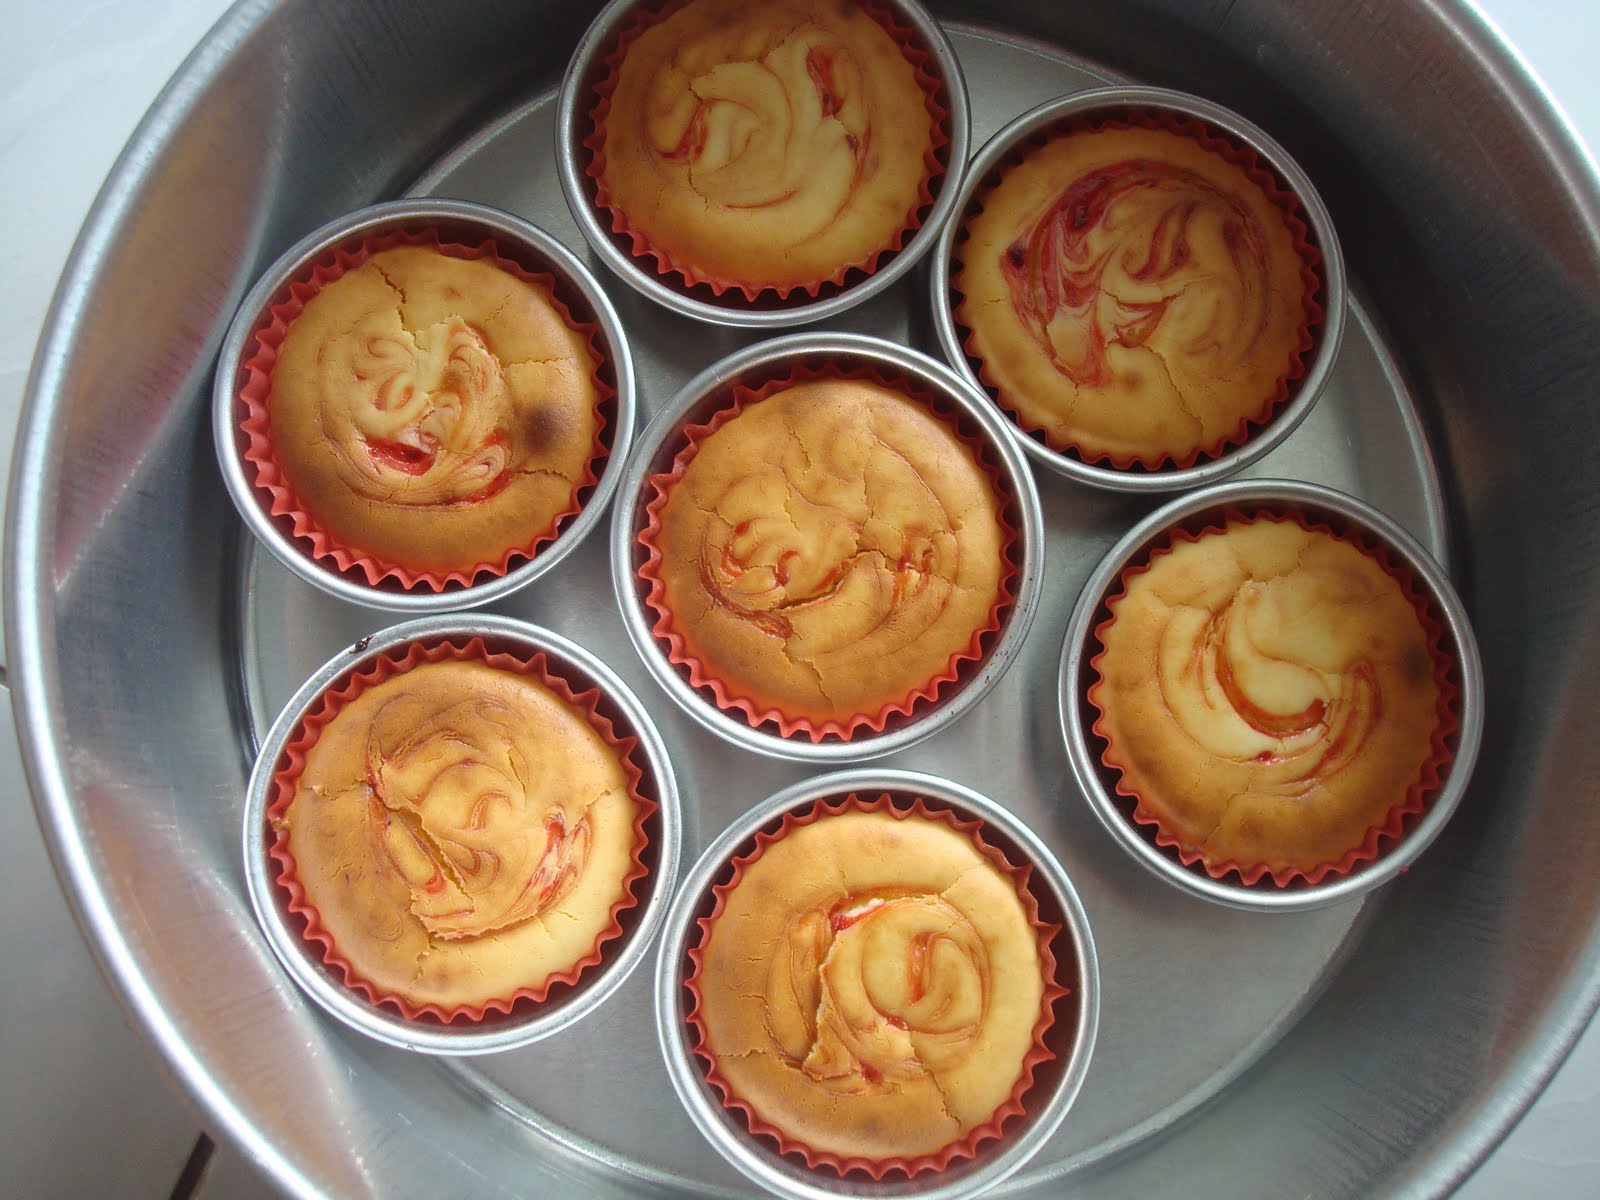
I had tried to bake Blueberry Swirl Cheesecake a couple of time and the results was good. I got the recipe from my friend. After doing many research, i found this recipe is the simplest one among the bake cheesecake due to the blueberry pie filling can easy obtained from baking shop and the price is reasonable. However, i still wish to use flesh pie filling so i decide to use Roselle jam( the recipe can be found in this blog too) as the substitution. I use Oreo this round instead the graham crackers i usually use, Mcvitie's Digest. Here is the outcome! I like the contrast, black, white and red! Taste wise, Oreo crust slightly bitter might due to overheat although i just heat it at 160C for 5min. Oreo biscuit is dark in color so it might tend to absorb heat faster. Cheese is not sweet for this round might due to organic sugar is relatively less sweet than the normal brown sugar i use. Roselle pie filling does not have strong aroma as compare to blueberry pie filling which i expected. Overall, i still like it.

Prepare Time: 2 hours
Bake Time: 40-50min
Serving: 8 people

Estimate Cost: RM30

Ingredients for Crust:
Kraft Oreo Cookies 1 roll with net weight 137gram (cream removed)
Margerin or melted butter 2 tablespoons
Sugar 1 tablespoon (granuated) - optional

Ingredients for Butter:
Philadelphia Cream Cheese 1kg at room temperature (originally come at 2kg so i cut it half)
Eggs 4pcs
Vanilla Extract 1 teaspoon - optional
Sugar 3/4 cup

Instructions for Crust:
1. Break the biscuits into small pieces and put it in a small plastic bag. Crush into tiny pieces with a pin rolling on the bag. Some recipes uses food processor.
2. Place the cookies into a medium bowl and add in the margarine or butter part by part until the cookies turns moist or wet looks. Do not put all the margarine at once as some cookies might have different level of oiliness.
3. Apply some margarine on the 9 inch spring form pan, both bottom and the sidewall. This avoids the crust or cake crack at the side when removing the pan.
4. Pour the cookies mixture into the pan and press it down evenly on the bottom pan with a spoon. Ensure the outer boundary of the crust is also nicely press down. This step is crucial to ensure the crust is not stick to the bottom pan upon removing the pan.
5. Bake it at oven for about 5-10min at 160C or upon the crust turns fragrant. I strongly suggest to stay at the oven for close monitoring and get ready with your hand ware to remove the pan from the oven. Optionally, just leave the pan into fridge to get set while preparing the cheese.

Instruction for Cake:
1. To start with, the cream cheese should be left at room temperature for at least one hour before beating. Cut it into small cubes will fasten the beating process. This ensures no lump in the mixture in later stage.
2. Beat the cheese until smooth at low speed for about 1 or 2min. It takes longer time if the cheese is not resting at room temperature long enough.
3. Add one third of the sugar and beat until the sugar fully dissolve into the cheese. Add another third of sugar and repeat for the last one third.
4. Scrape down the mixture from the mix bowl side wall and do the last beat before adding the eggs. This is a crucial step to avoid lump in the butter.
5. Add one egg at a time and mix well. This step repeated until all eggs are added.
6. Add in the vanilla extract and do the last beat.
7. Pour one half of the mixture onto the crust.
8. Scope some Roselle pie filling on the mixture on a few spots and then cut it through in butter with a knife as long the knife does not touch the crust.
9. Fill up all the left over butter.
10. Preheat the oven at 220C.
11. Put a tray at the bottom rack and fill it with hot water. This water bath will ensure the cake will not crack and remain moisture.
12. Put the cake at the middle of the rack and bake for about 35-40min or when the butter turns brown on the surface. The surface will have uneven brown look.
13. Remove the pan from the oven and let it cools down on a rack.
14. Cover the pan with a aluminum and chill it over night in frige after it fully turns cold.
15. Top up with the Roselle jam the following morning before serving.

From my personal opinions:
1. I had tried with bake or no bake crust but the outcome is still the same, the crust is still soft after chill. So, i would recommend not to bake it. Moreover, the crust is already bake in the manufacturing, additional baking will not much changes the aroma.
2. Dont worry with the brown surface as it will be covered by the pie filling.
3. Crack cheesecake at the surface will not affect the taste but only the outlook. Usually it will be also covered by the pie filling afterward.

Saturday, November 7, 2009

Roselle Syrup and Jam

I learn about roselle plant when i was a little girl. My parents planted the trees in the garden. We use it to make syrup drinks. I was always attracted to it. Last two weeks, i spotted it in the market and without hesitating, i bought half a kilogram at RM2. One auntie taught me to blend and cook the after-boiled calyces for jam. I bought a kilogram of organic sugar for taste as i know it is going to consume a lot of sugar due to its distinct sour taste. The syrup is good especially after chilling. My hubby loves it! As for the jam, i spread it on bread or biscuits and it is good! The aroma for jam is less as compare to the syrup.

Prepare Time: 10min
Cook Time: 30min
Serving: Around two bottles of 1.5litres mineral water containers and 1 cup of jam

Estimate Cost: RM5

Ingredients:
Roselle flowers half a kilogram
Sugar a cup
Water 4litres

Instructions:
1. Discard the seeds, keep and wash the calyces.
2. Boil water and add in the calyces. Boil for 10min or when the calyces loss the color.
3. Add in sugar and let it cools down before storage.
4. Remove the calyces from the syrup.
5. Blend the calyces after it gets cold.
6. Cook the calyces in a pan for about 5min, low heat, and add in sugar for taste.

Roselle benefits can be found at:
http://www.thejakartapost.com/news/2009/08/05/roselle-benefits-more.html

Paper Mint with Egg Soup


Last few days ago, my neighbor gave me some paper mint leaves as she has harvested too much and cannot finish all. She gave me some and thought me how to cook a simple paper mint egg soup. Again, i tried twice and the results were good. If you like the aroma from paper mint, you may give it a try.


Prepare Time: 5min
Cook Time: 5min
Serving: 3-4 peoples

Estimate Cost: RM1.50

Ingredients:
Paper mint leaves 1 bundle
Eggs 3 pcs
Cooking oil 2 tablespoons
Hot water 1 cup
Salt

Instructions:
1. Heat up the oil.
2. Stir fry the eggs until cook, slightly scramble it.
3. Add in water and cook until to boil.
4. Add in paper mint and cook to boil.
5. Add salt and serve warm.

Peppermint leaf benefit can be found at:
http://www.natural-homeremedies.com/blog/how-you-can-use-mint-for-good-health/

Pumpkin with Shrimps


I came across a book namely "Health Plus Reduce Health Guide". It mentions about eating pumpkin together with shrimps helps to reduce black spots, wrinkle and tiredness. Pumpkin has vitamin-C where else shrimps consists high protein thus gives high Collagen. I also learn stir fry curry leaves with pumpkin adds aroma to the pumpkin dish. So, i decided to give it a try - "Pumpkin with Shrimps". The result is superb! I tried the recipe twice and the outcomes are good. My hubby and Hong Zheng loving it! Easy to cook and the quality is easily maintain. It is a sure work recipe.

Prepare Time: 30min
Cook Time: 10min
Serving: 2-3 people

Estimate Cost: RM6

Ingredients:

Cooking oil 2 tablespoons
Pumpkin medium size half (cubed) RM1.50
Garlic 5 gloves (finely chopped)
Curry leaves 2 stalks
Shrimps 300gm (discard the shell and Straight Dope - the black contents in the intestine) RM4.50
Hot water 1 cup
Soy sauce 1 tablespoon
Salt

Instructions:
1. Heat up the oil in the fry pan.
2. Stir fry the garlic and curry leaves until aroma.
3. Put in the shrimps and cook for 80% cook.
4. Add some salt for taste.
5. Keep the shrimps aside and leave some oil behind.
6. Add in pumpkin cubes and stir fry then add in the hot water and cover the pan.
8. Add in soy sauce when the pumpkin turns soft.
9. Add soy sauce for taste and serve warm.

Health info is only for reference. No true research was carried up!

Pumpkin benefits can be found at:
http://hubpages.com/hub/Health-Benefits-of-Pumpkin